Before reading this article, you may be interested in Part 1 (The Fundamentals of Testing) and Part 2 (Psychological Tests) of the series.
Range of motion (ROM) is the degree of motion that occurs at a joint. It is influenced by connective tissue structure, activity level, age and gender, and it is very specific to the joint (i.e. ball/socket joints vs hinge joint).
The optimal level of flexibility changes with the sport i.e. gymnasts need more shoulder flexibility than cyclists. It is important to note that injury risk increases when an athlete leaves the optimal range of flexibility for their sport. Both hyper-flexibility and hypo-flexibility increase injury and imbalance in flexibility may also increase injury risk.
Flexibility is a measure of ROM with two components. Dynamic flexibility is the available range of movement during active movements and it requires voluntary muscle actions. Static flexibility is the range of possible movement about a joint during passive movement. In this section, you will assess dynamic flexibility with a sit-and-reach test.
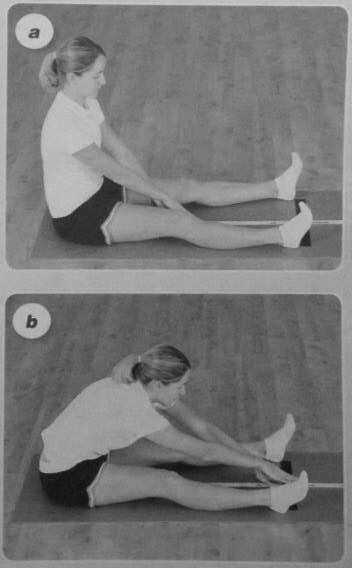
The sit-and-reach is probably the most widely used flexibility test. It provides an assessment of the flexibility of the hamstrings, hip and lower back, which are important for many activities. Below are the testing procedures for the sit-and-reach test.
- Clients should perform a short warm-up prior to this test and include some stretches (i.e. modified hurdlers stretch). The participant should refrain from fast, jerky movements, which may increase the possibility of injury. The participant’s shoes should be removed.
- Place a measuring tape on the floor with a right-angle line (made with tape) at the 15-inch mark. The client sits with the measuring tape between the legs, with legs extended at right angles to the taped line on the floor. Heels of the feet should touch the edge of the right angle taped line (at the 15-inch mark) and be about 10 to 12 inches apart.
- The client should slowly reach forward with both hands as far as possible, holding this position for approximately 2 s. Be sure that the participant keeps the hands parallel and does not lead with one hand. Fingertips can be overlapped and should be in contact with the measuring tape.
- The score is the most distant point (cm or inches) reached with the fingertips. The best of two trials should be recorded. To assist with the best attempt, the client should exhale and drop the head between the arms when reaching. Testers should ensure that the knees of the participant stay extended; however, the participant’s knees should not be pressed down. The client should breathe normally during the test and should not hold his/her breath at any time
Download the MMA Training Bible’s data collection book here. This will allow you to record your data and chart your progress on this test and all of the other tests described in this article series.
Take care,
Dr. Gillis
Leave a Reply